ESP8266 NodeMCU - OLED display using SPI
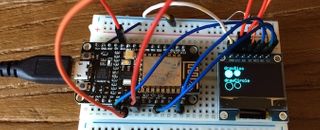

I bought a $4 1 inch OLED SPI display that I wanted to use with my ESP8266 development board. By using an online service to create a streamlined NodeMCU firmware this was a breeze!
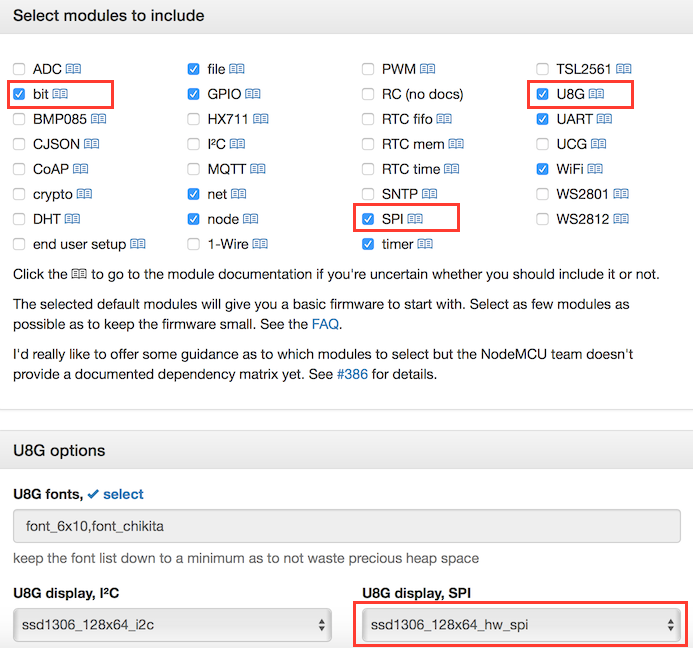
NodeMCU with the correct modules
Flash the ESP8266 with a version of NodeMCU that contains the following modules:
- bit
- SPI
- U8G
Follow my post here on how to built a custom NodeMCU firmware the easy way!
If you need help flashing the firmware you can take a look at my guide here.
Parts
If you don’t mind waiting a few weeks I would recommend buying from AliExpress as I have done for the lowest price and free shipping, even to Europe! Amazon, even with Amazon Prime is just a bit too expensive.
Disclaimer
This post contains links to Amazon where I get a small commission if you purchase anything after clicking on these links - at no extra cost to you! But only if you have explicitly consented to this. I have purchased all the mentioned products myself and I only link to products that I believe are the best for my readers. If you want to help out even more, take a look here.| Part | Ali Express | Amazon |
|---|---|---|
| 1x ESP8266 development board | $4.2 | $9 |
| 1x 0.96 inch 128X64 OLED SPI module | $4.1 | $10.7 |
| 1x breadboard | $1.2 | $5.2 |
| 1x 10K resistor | $0.7 | $4.9 |
| Various breadboard wires | $2.6 | $5.9 |
| Total | $12.8 | $35.7 |
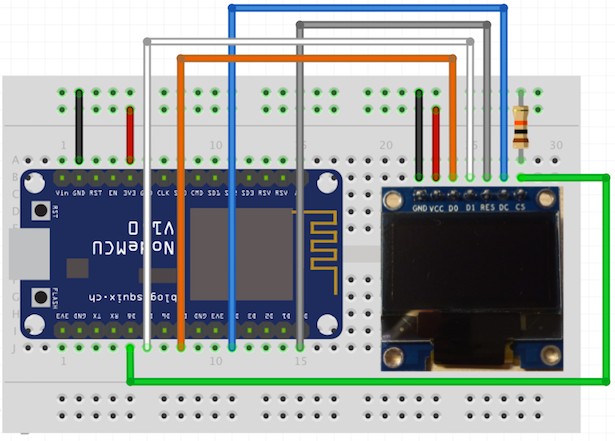
Hardware setup
Code
To get started I cheated a bit and used the test code from the U8G library from Github here. I downloaded the file u8g_graphics_test.lua and changed line 158 to
--init_i2c_display()
and line 159 to
init_spi_display()
Then I renamed the file to init.lua and uploaded the file to the ESP8266. The modified file can also be copied from here:
1
2
3
4
5
6
7
8
9
10
11
12
13
14
15
16
17
18
19
20
21
22
23
24
25
26
27
28
29
30
31
32
33
34
35
36
37
38
39
40
41
42
43
44
45
46
47
48
49
50
51
52
53
54
55
56
57
58
59
60
61
62
63
64
65
66
67
68
69
70
71
72
73
74
75
76
77
78
79
80
81
82
83
84
85
86
87
88
89
90
91
92
93
94
95
96
97
98
99
100
101
102
103
104
105
106
107
108
109
110
111
112
113
114
115
116
117
118
119
120
121
122
123
124
125
126
127
128
129
130
131
132
133
134
135
136
137
138
139
140
141
142
143
144
145
146
147
148
149
150
151
152
153
154
155
156
157
158
159
160
161
162
163
164
165
-- ***************************************************************************
-- Graphics Test
--
-- This script executes several features of u8glib to test their Lua bindings.
--
-- Note: It is prepared for SSD1306-based displays. Select your connectivity
--       type by calling either init_i2c_display() or init_spi_display() at
--       the bottom of this file.
--
-- ***************************************************************************

-- setup I2c and connect display
function init_i2c_display()
    -- SDA and SCL can be assigned freely to available GPIOs
    local sda = 5 -- GPIO14
    local scl = 6 -- GPIO12
    local sla = 0x3c
    i2c.setup(0, sda, scl, i2c.SLOW)
    disp = u8g.ssd1306_128x64_i2c(sla)
end

-- setup SPI and connect display
function init_spi_display()
    -- Hardware SPI CLK  = GPIO14
    -- Hardware SPI MOSI = GPIO13
    -- Hardware SPI MISO = GPIO12 (not used)
    -- CS, D/C, and RES can be assigned freely to available GPIOs
    local cs  = 8 -- GPIO15, pull-down 10k to GND
    local dc  = 4 -- GPIO2
    local res = 0 -- GPIO16

    spi.setup(1, spi.MASTER, spi.CPOL_LOW, spi.CPHA_LOW, 8, 8)
    disp = u8g.ssd1306_128x64_hw_spi(cs, dc, res)
end


-- graphic test components
function prepare()
    disp:setFont(u8g.font_6x10)
    disp:setFontRefHeightExtendedText()
    disp:setDefaultForegroundColor()
    disp:setFontPosTop()
end

function box_frame(a)
    disp:drawStr(0, 0, "drawBox")
    disp:drawBox(5, 10, 20, 10)
    disp:drawBox(10+a, 15, 30, 7)
    disp:drawStr(0, 30, "drawFrame")
    disp:drawFrame(5, 10+30, 20, 10)
    disp:drawFrame(10+a, 15+30, 30, 7)
end

function disc_circle(a)
    disp:drawStr(0, 0, "drawDisc")
    disp:drawDisc(10, 18, 9)
    disp:drawDisc(24+a, 16, 7)
    disp:drawStr(0, 30, "drawCircle")
    disp:drawCircle(10, 18+30, 9)
    disp:drawCircle(24+a, 16+30, 7)
end

function r_frame(a)
    disp:drawStr(0, 0, "drawRFrame/Box")
    disp:drawRFrame(5, 10, 40, 30, a+1)
    disp:drawRBox(50, 10, 25, 40, a+1)
end

function stringtest(a)
    disp:drawStr(30+a, 31, " 0")
    disp:drawStr90(30, 31+a, " 90")
    disp:drawStr180(30-a, 31, " 180")
    disp:drawStr270(30, 31-a, " 270")
end

function line(a)
    disp:drawStr(0, 0, "drawLine")
    disp:drawLine(7+a, 10, 40, 55)
    disp:drawLine(7+a*2, 10, 60, 55)
    disp:drawLine(7+a*3, 10, 80, 55)
    disp:drawLine(7+a*4, 10, 100, 55)
end

function triangle(a)
    local offset = a
    disp:drawStr(0, 0, "drawTriangle")
    disp:drawTriangle(14,7, 45,30, 10,40)
    disp:drawTriangle(14+offset,7-offset, 45+offset,30-offset, 57+offset,10-offset)
    disp:drawTriangle(57+offset*2,10, 45+offset*2,30, 86+offset*2,53)
    disp:drawTriangle(10+offset,40+offset, 45+offset,30+offset, 86+offset,53+offset)
end

function ascii_1()
    local x, y, s
    disp:drawStr(0, 0, "ASCII page 1")
    for y = 0, 5, 1 do
        for x = 0, 15, 1 do
            s = y*16 + x + 32
            disp:drawStr(x*7, y*10+10, string.char(s))
        end
    end
end

function extra_page(a)
    disp:drawStr(0, 12, "setScale2x2")
    disp:setScale2x2()
    disp:drawStr(0, 6+a, "setScale2x2")
    disp:undoScale()
end


-- the draw() routine
function draw(draw_state)
    local component = bit.rshift(draw_state, 3)

    prepare()

    if (component == 0) then
        box_frame(bit.band(draw_state, 7))
    elseif (component == 1) then
        disc_circle(bit.band(draw_state, 7))
    elseif (component == 2) then
        r_frame(bit.band(draw_state, 7))
    elseif (component == 3) then
        stringtest(bit.band(draw_state, 7))
    elseif (component == 4) then
        line(bit.band(draw_state, 7))
    elseif (component == 5) then
        triangle(bit.band(draw_state, 7))
    elseif (component == 6) then
        ascii_1()
    elseif (component == 7) then
        extra_page(bit.band(draw_state, 7))
    end
end

function graphics_test()

    disp:firstPage()
    repeat
        draw(draw_state)
    until disp:nextPage() == false

    if (draw_state <= 7 + 8*8) then
        draw_state = draw_state + 1
    else
        print("--- Restarting Graphics Test ---")
        draw_state = 0
    end

    print("Heap: " .. node.heap())
    -- retrigger timer to give room for system housekeeping
    tmr.start(0)
end

draw_state = 0

--init_i2c_display()
init_spi_display()

-- set up timer 0 with short interval, will be retriggered in graphics_test()
tmr.register(0, 100, tmr.ALARM_SEMI, function() graphics_test() end)

print("--- Starting Graphics Test ---")
tmr.start(0)
Result
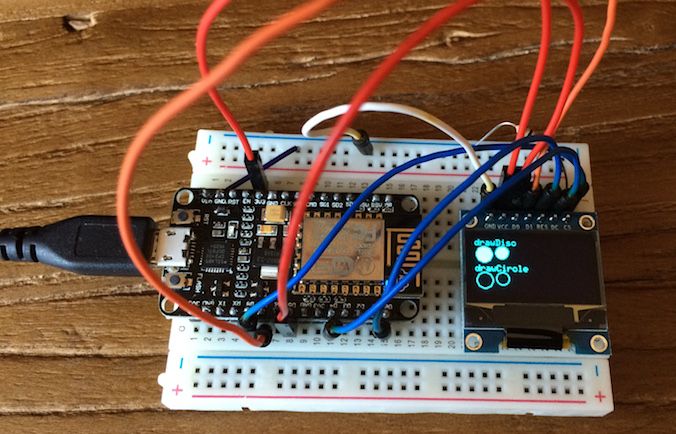
Everything works and from here it is just a matter on using the U8G library to show what you need. Take a look at the NodeMCU U8G documentation here.
Enjoyed this content?
Help keep it free by sending a donation. You can also subscribe to various site feeds to get notified of new posts, follow me on social media, and more.