Free SSL certificates with Let’s Encrypt
Let’s Encrypt is a free, automated, and open certificate authority which is currently in open beta. Translation: Get free SSL certificates without all the hassle of creation and renewal! This is backed by major players like Mozilla, Facebook, Chrome and Cisco. Even if you don’t use SSL on your website at the moment, you might be soon because current implementations of HTTP/2 requires it. This blog is already running over HTTP/2 as is my content delivery network KeyCDN. KeyCDN also uses Let’s Encrypt to automatically enable free certificates for your CDN domain, e.g. https://cdn.domain.com. There are other ways of getting free certificates like StartSSL.com, but it is a cumbersome process to renew these certificate and create new ones. I will show how you can get quickly up and running and automatically renew the certificates. This post uses NGINX running on Ubuntu 14.04 as an example, but any other webserver and operating system should be able to get a similar solution working. There a few limitations compared to traditionally issued SSL certificates.
- Certificates are only domain validated. All other information contained in the certificate is not validated.
- Certificates are valid for 90 days. They must be renewed periodically
Unless you are running an internet store where trust is very important, this should not be a problem.
Setup Let’s Encrypt
Login to the webserver and download Let’s Encrypt
$sudo apt-get -y install git
$cd /opt
$git clone https://github.com/letsencrypt/letsencrypt
Obtain a certificate
In order to obtain a certificate you need to prove you have control of the webserver that your domain points to. There are several ways to do this, but I found the easiest way to allow Let’s Encrypt to store a file temporarily on my webserver in order to validate access to the webserver, a method called webroot. Use the following server block and replace line 13-15 with your own rules. In all the examples in this post replace www.example.com and some@email.com with your own information. Since I do not use http (port 80) for anything else, I redirect all traffic to https in this example. The path root /var/www/html/lets_encrypt is dedicated to Let’s Encrypt.
1
2
3
4
5
6
7
8
9
10
11
12
13
14
15
16
server {
        listen 80;
        server_name www.example.com;

        location ~ /.well-known {
                allow all;
                default_type "text/plain";
                root         /var/www/html/lets_encrypt;
        }

        # Insert your own rules here for you non https server.
        # I choose to redirect all traffic to https
        location / {
                return         301 https://$server_name$request_uri;
        }
}
Now lets create a certificate using the letsencrypt-auto script. Run this without sudo as the script will ask for permission if needed.
Warning! There is a limit to how often you can request and renew a certificate at Let’s Encrypt. Use the --test-cert parameter when testing.
$/opt/letsencrypt/letsencrypt-auto certonly --agree-tos -a webroot -w /var/www/html/lets_encrypt -d www.example.com --rsa-key-size 4096 --email some@email.com
Updating letsencrypt and virtual environment dependencies......
Requesting root privileges to run with virtualenv: sudo /home/myuser/.local/share/letsencrypt/bin/letsencrypt certonly --agree-tos -a webroot -w /var/www/html/lets_encrypt -d www.example.com --rsa-key-size 4096 --email some@email.com

IMPORTANT NOTES:
 - Congratulations! Your certificate and chain have been saved at
   /etc/letsencrypt/live/www.example.com/fullchain.pem. Your cert
   will expire on 2016-05-15. To obtain a new version of the
   certificate in the future, simply run Let's Encrypt again.
 - If you like Let's Encrypt, please consider supporting our work by:

   Donating to ISRG / Let's Encrypt:   https://letsencrypt.org/donate
   Donating to EFF:                    https://eff.org/donate-le
If everything went well you should see an output similar to the above. The most recent certificate is always located at /etc/letsencrypt/live/www.example.com/ and contains 4 files:
cert.pemchain.pemfullchain.pemprivkey.pem
You are now ready to use the certificate.
Configure NGINX
Now we create a test site using SSL using our new certificate:
1
2
3
4
5
6
7
8
9
10
11
server {
	listen 443 ssl;
	server_name www.example.com;

	ssl_certificate /etc/letsencrypt/live/www.example.com/fullchain.pem;
	ssl_certificate_key /etc/letsencrypt/live/www.example.com/privkey.pem;
	ssl on;
	ssl_protocols TLSv1 TLSv1.1 TLSv1.2;
	ssl_prefer_server_ciphers on;
	ssl_ciphers ‘ECDHE-ECDSA-CHACHA20-POLY1305:ECDHE-RSA-CHACHA20-POLY1305:ECDHE-ECDSA-AES128-GCM-SHA256:ECDHE-RSA-AES128-GCM-SHA256:ECDHE-ECDSA-AES256-GCM-SHA384:ECDHE-RSA-AES256-GCM-SHA384:DHE-RSA-AES128-GCM-SHA256:DHE-RSA-AES256-GCM-SHA384:ECDHE-ECDSA-AES128-SHA256:ECDHE-RSA-AES128-SHA256:ECDHE-ECDSA-AES128-SHA:ECDHE-RSA-AES256-SHA384:ECDHE-RSA-AES128-SHA:ECDHE-ECDSA-AES256-SHA384:ECDHE-ECDSA-AES256-SHA:ECDHE-RSA-AES256-SHA:DHE-RSA-AES128-SHA256:DHE-RSA-AES128-SHA:DHE-RSA-AES256-SHA256:DHE-RSA-AES256-SHA:ECDHE-ECDSA-DES-CBC3-SHA:ECDHE-RSA-DES-CBC3-SHA:EDH-RSA-DES-CBC3-SHA:AES128-GCM-SHA256:AES256-GCM-SHA384:AES128-SHA256:AES256-SHA256:AES128-SHA:AES256-SHA:DES-CBC3-SHA:!DSS’;
}
Restart NGINX and you should have a site up and running!
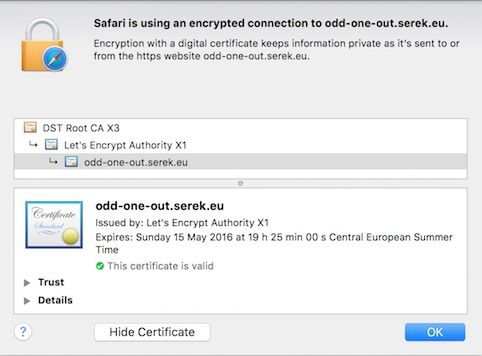
$sudo service nginx restartConfirm that the site is using the new certificate from Let’s Encrypt in a browser.
Configure automatic certificate renewal
Renewing a certificate is exactly the same command as creating a new one except there is an extra parameter --renew-by-default:
$/opt/letsencrypt/letsencrypt-auto certonly --renew-by-default --agree-tos -a webroot -w /var/www/html/lets_encrypt -d www.example.com --rsa-key-size 4096 --email some@email.comLets wrap this up in a cron job that runs monthly:
$sudo crontab -eAnd add the following entry at the end of the file
@monthly (/opt/letsencrypt/letsencrypt-auto certonly --renew-by-default --agree-tos -a webroot -w /var/www/html/lets_encrypt --d www.example.com --rsa-key-size 4096 --email some@email.com && service nginx restart) >> /var/log/letsencrypt.logNotice that I restart NGINX when a reload should be enough. Reloading NGINX did not work for me, I needed to restart the NGINX server before the updated certificate worked.